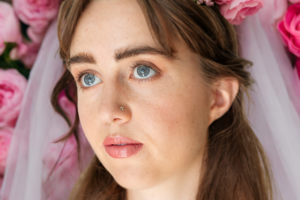
Who doesn’t adore a clean bridal eye? If you are looking for a bridal look that you can flaunt without being too fierce, this is the tutorial for you. We love glamorous eyes, but sometimes we just want a soft touch of beauty. Whether you’re looking for a look for your reception, bridal party, the big day or anything else bridal related, this soft eyeshadow look by licensed esthetician Judy Porter with Blush Now is all the hype. In ten easy steps, your soft eyeshadow look awaits you!
If a purchase is made from the links provided, Wed Mayhem may receive a small commission.
01
Prime them eyes!
It’s all about the primer! This base layer is the first and most important step since your makeup can smear or fold without primer. We used the Matte Ulta Beauty Eye Primer. Use your finger or a makeup brush to apply the primer to your eyes. The primer will help to calm down any oils on your eyelid making sure your makeup stays in tip top shape.
02
Apply powder!
Apply a light amount of powder to the eyes. Not too much, but just enough to set the primer. We used the Mac Mineralize Powder.
03
The eyeshadow magic begins!
Using a medium fluffy brush, take a light brown color and begin on the outside corner of your eye. Wherever you place your brush first is where you will get the most color so make sure you are starting in the outside corner of your eye. Moving the brush in a circular motion, slowly begin to drag the color into the top of the eyelid. At this point your eye should be outlined in a light brown color. We used the ManEater Palette by Tarte.
04
Blend, add color, blend!
Using a slightly smaller fluffy round brush, take a light skin-toned color and move from the middle of the eyelid towards the inner corner of the eye. Move the brush in small circles. Blend this color into the light brown on the outside of the eye. This will soften the look and brighten the inner corner of the eye.
05
Shimmer the brows, shimmer the corner, shimmer it all.
Using a flat brush take a light and slightly shimmery color and apply beneath the eyebrows. Start on the outside corners and underline the eyebrow. Make sure to blend and not to use too much product. This will help your makeup pop. Next, take this same color and place it in the inner corners of the eyes.
06
Give me them thick lashes!
Using the same flat brush as before, take a dark brown color and line the lash line. This should create a very soft and romantic eyeline. This will give the lashes the perfect amount of depth and thickness.
07
Maintenance.
Using a makeup wipe clean up just beneath your under eye. You can take the wipe out past the corner of your eye to create a wing shape if desired. This isn’t necessary! It can’t hurt to clean.
08
We have to show the under eyes some lovin’ too!
If you are wearing face makeup with this look, now would be a good time to blend out your concealer to make sure you don’t experience any creasing later. Next, take a flat brush, using the same light brown color used previously, lightly brush the color onto the lower lash line. This will make your eyes pop without looking too harsh.
09
Curl them lashes!
Take your lash curler and curl your lashes in preparation for mascara! This will lift and open your eye while making it look bigger and brighter!
10
Finishing touches!
It’s time to apply your mascara! We recommend using a waterproof mascara because you never know when the water works will pay a visit. All things bridal and wedding can get quite emotional. We used the Elf Lash It Loud Mascara. Complete the top or the bottom lashes first and let them completely dry before completing the other side. This will lower your chances of mascara flying all over the place. When you apply mascara to your lower lashes it can help to blot off some of the product on a paper towel. Less is more!
And with that, your soft eyeshadow look is ready to hit the aisle. You could never look more beautiful! This look is one you can take on and off the reception dance floor as you celebrate everything wedding. If you are looking to complete this makeup look check out the links below.








Comments
Nothing Yet
Be the first one to comment!
Comment Submitted
Thank you for your comment, you will receive an email when your post is public. Your Wed Mayhem Team