Luscious Bushy Brows Crafted By Makeup
4 min

Bushy Brows Crafted By Makeup At Home

What’s better than a brushed up fluffy brow? Nothing. That is why we are here to give you the perfect step by step process to attaining your perfect brow. You deserve the most luscious brows makeup can craft. Perfecting a fluffy brow has never been easier! Get you makeup ready because your new brow awaits. 

credit: Judy Porter with Blush Now

01

Wax them brows!

Start with your brow wax and a spoolie. Begin by brushing your brows upwards with the wax on the spoolie. An alternative to brow wax is brow glue which will give you the same results! Make sure to use wax, glue, or another alternative that will hold your brows in the direction that you want them to go. We used the Mehron Pro Brow Palette.

02

The outline begins!

Use a brow pencil to fill in some areas of your brow that have some space. Use light strokes to mimic eyebrow hair. After you have filled in your brows, take your waxed spoolie and brush over the areas that were just filled. This will help to blend in the pencil with the hair. We used the Benefit Precisely My Brow Pencil in 3.5 which works with almost all eyebrow hair colors. This is a perfect stopping point if you are feeling like your bushy brows are giving everything you need them to give. 

03

Polish, polish, polish!

Using an angle brush or flat brush and a brow color, use a small amount of product and tap off the excess. Start at the bottom of your brow and slowly begin to create the desired brow shape. Have your brush strokes flick upwards towards the top of the brow as you create the outline and work your way up the brow. This will darken the brow and fill it in. We used the Mehron Pro Brow Palette. Remember that it is easier to add product than it is to take it off. Use a gentle hand. 

04

Not twins!

If your brows are uneven, take the same brow color you were just using or a darker shade and work to create symmetrical brows. You can fill in the same spot on the other eyebrow as well to make sure the colors of each brow appear even. Clean up any product that could have gone above the brow with your fingers. Finally, take your waxed spoolie and brush your brows once more to blend in the color. Eyebrows are sisters not twins, so it won’t always be perfect!

05

Make‘em pop!

Define the area underneath your brows with some concealer. We used Nars Concealer. Taking the edge of your concealer brush and a small amount of product, place the product under the bottom of the brow. This will make your eyebrows pop! Blend out any visible lines with your fingers. You can also clean the top of the brow with the same concealer.

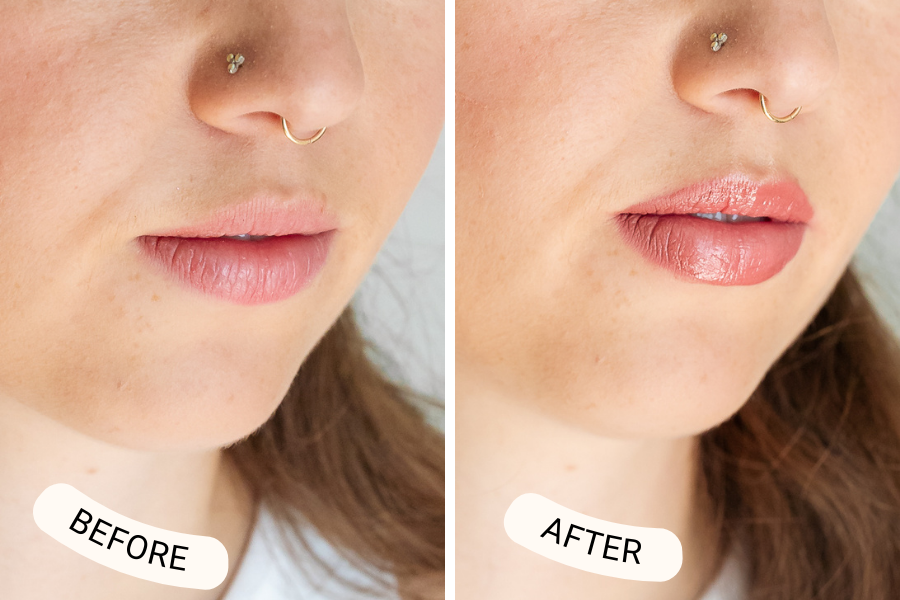
Subtle, easy, bushy brows await you! If you’ve been dying to show off your bushy brows, it’s never been easier than this. Practice makes perfect, if you don’t hit the nail on the head the first time around, erase and start over. Within no time you’ll have bushy brows galore! Easy peasy! Next up, take a look how to get natural full lips, HERE.

Subscribe To Get Your Wedding Planning Checklist!

Unsubscribe from newsletter at any time.

4 min

7 Easy Steps to Natural FULL Lips

makeup tutorial

Getting your glam on has never been easier. We adore full lips, but not always the trip to the aesthetician. That’s why Wed Mayhem asked licensed esthetician Judy Porter with Blush Now how to get plump lips using makeup rather than injection. When it comes to pumping up your lips, we have the tips and tricks for you! Get ready because with these seven easy makeup steps, you’ll have plump, luscious, and full lips in no time. Follow along with our tutorial if you need a visual reference.

credit: Judy Porter with Blush Now

01

Prime: Apply lip scrub

To kick off your full lip tutorial, begin with a lip scrub to make sure that your lips are as smooth as possible. We use The Soap Shop lip scrub. The best part about this lip scrub is that you can eat it too! Apply the scrub in a circular motion onto the lips. Shop the product HERE.

02

Moisturize: Apply lip repair

Lick off the lip scrub and apply some Aquaphore lip repair. Only apply a small amount so that the lips are hydrated but not slippery. This will soften the lips and prime them for makeup. Shop the product HERE

03

Extend Lip: Apply lip pencil

Let the business begin! Starting at the outside corners and going in, stay on your natural lip line as you trace the corners. It can be easier to use the flat side of your pencil rather than the pointy side when tracing the corners of your lip. As you approach the middle of your lip begin to overline the edge of your lip and the space above your lip by a small amount. Try to go just above the vermilion so it stays in the realm of believability. Finally, connect this back to the natural lip line. We use the Charlotte Tilbury lip pencil in the color pillow talk. Shop the product HERE

04

Plump: Apply Contour Colors

Choose a light shade and a slightly darker shade lip contour. Begin with the darker shade, and line the outside corners of your lips. Make sure to stop when you get close to the middle of your lip. Next, go in with your lighter color lip contour and focus the color on the middle of the lip. Paint the contour onto the whole middle of the lip. This will create a “pout” like appearance. We use the Aethetica Contour Lip Palette. Shop the product HERE

05

Lift: Apply Lip Gloss

Apply your gloss into the middle of the lip where you just applied the lighter color of your lip contour. This will help attract the light and create the illusion of fuller lips. We use the Charlotte Tilbury lip gloss in the color Pinkgasm. Shop the product HERE

06

Pop: Apply Highlighter

Take a pencil brush and a highlighter that is almost skin color and place the highlighter on the top of the cupid’s bow. This should reflect the light and add fullness making the lips pop. We use Girlactik highlighter. Shop the product HERE

07

Refine: Clean Up With Concealer

We use Nars Concealer. Place concealer onto a concealer brush and with a small amount of product, clean up the lip line. This will help the lip pop even more! Make sure to blend out your concealer well so that it doesn’t catch any unwanted eyes. Shop the product HERE

With that, you should have plump, full, glamorous lips ready for your next outing. Practice makes perfect so if your lips didn’t turn out how you wanted the first time around, keep practicing. You’ll have the best lips in town!

Subscribe To Get Your Wedding Planning Checklist!

Unsubscribe from newsletter at any time.

Comments

Leave a Reply

Your email address will not be published. Required fields are marked *

Nothing Yet

Be the first one to comment!

This site is protected by reCAPTCHA and the Google Privacy Policy and Terms of Service apply.