7 Easy Steps to Natural FULL Lips
4 min

7 Easy Steps to Natural FULL Lips

makeup tutorial

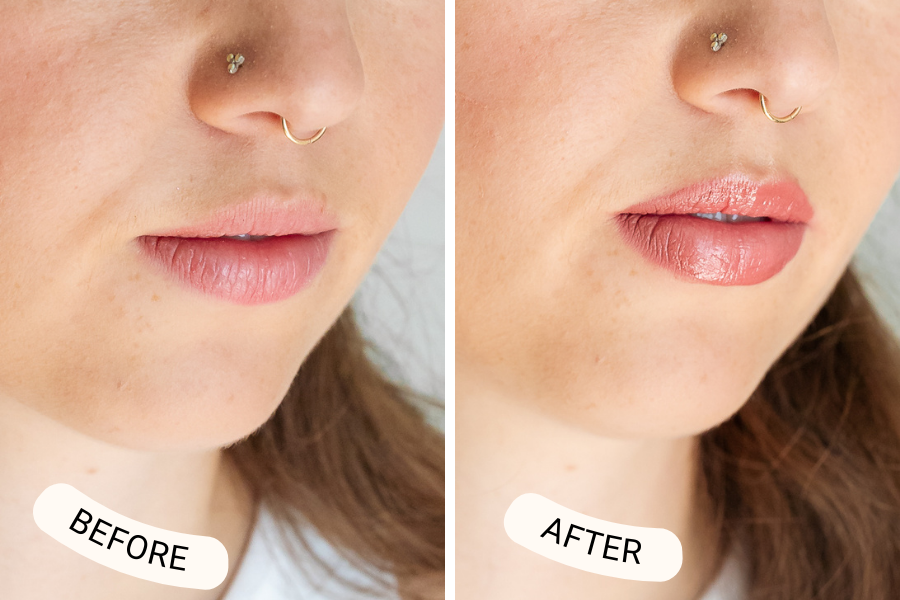
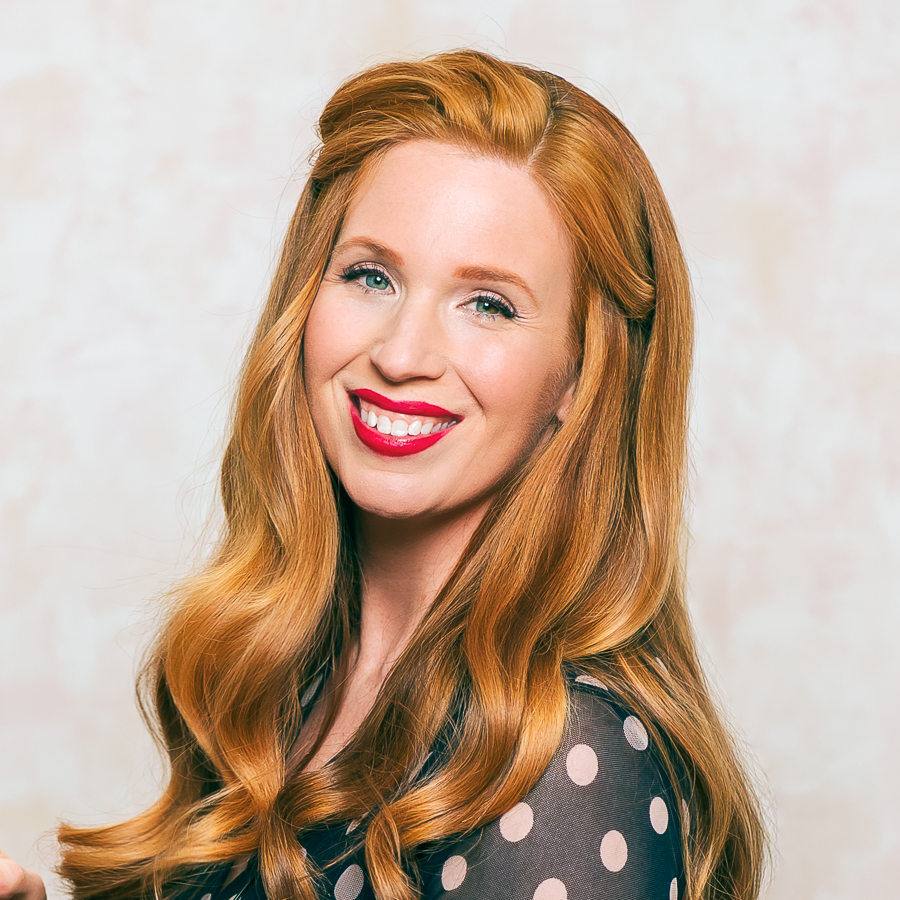
Getting your glam on has never been easier. We adore full lips, but not always the trip to the aesthetician. That’s why Wed Mayhem asked licensed esthetician Judy Porter with Blush Now how to get plump lips using makeup rather than injection. When it comes to pumping up your lips, we have the tips and tricks for you! Get ready because with these seven easy makeup steps, you’ll have plump, luscious, and full lips in no time. Follow along with our tutorial if you need a visual reference.

credit: Judy Porter with Blush Now

01

Prime: Apply lip scrub

To kick off your full lip tutorial, begin with a lip scrub to make sure that your lips are as smooth as possible. We use The Soap Shop lip scrub. The best part about this lip scrub is that you can eat it too! Apply the scrub in a circular motion onto the lips. Shop the product HERE.

02

Moisturize: Apply lip repair

Lick off the lip scrub and apply some Aquaphore lip repair. Only apply a small amount so that the lips are hydrated but not slippery. This will soften the lips and prime them for makeup. Shop the product HERE

03

Extend Lip: Apply lip pencil

Let the business begin! Starting at the outside corners and going in, stay on your natural lip line as you trace the corners. It can be easier to use the flat side of your pencil rather than the pointy side when tracing the corners of your lip. As you approach the middle of your lip begin to overline the edge of your lip and the space above your lip by a small amount. Try to go just above the vermilion so it stays in the realm of believability. Finally, connect this back to the natural lip line. We use the Charlotte Tilbury lip pencil in the color pillow talk. Shop the product HERE

04

Plump: Apply Contour Colors

Choose a light shade and a slightly darker shade lip contour. Begin with the darker shade, and line the outside corners of your lips. Make sure to stop when you get close to the middle of your lip. Next, go in with your lighter color lip contour and focus the color on the middle of the lip. Paint the contour onto the whole middle of the lip. This will create a “pout” like appearance. We use the Aethetica Contour Lip Palette. Shop the product HERE

05

Lift: Apply Lip Gloss

Apply your gloss into the middle of the lip where you just applied the lighter color of your lip contour. This will help attract the light and create the illusion of fuller lips. We use the Charlotte Tilbury lip gloss in the color Pinkgasm. Shop the product HERE

06

Pop: Apply Highlighter

Take a pencil brush and a highlighter that is almost skin color and place the highlighter on the top of the cupid’s bow. This should reflect the light and add fullness making the lips pop. We use Girlactik highlighter. Shop the product HERE

07

Refine: Clean Up With Concealer

We use Nars Concealer. Place concealer onto a concealer brush and with a small amount of product, clean up the lip line. This will help the lip pop even more! Make sure to blend out your concealer well so that it doesn’t catch any unwanted eyes. Shop the product HERE

With that, you should have plump, full, glamorous lips ready for your next outing. Practice makes perfect so if your lips didn’t turn out how you wanted the first time around, keep practicing. You’ll have the best lips in town!

Subscribe To Get Your Wedding Planning Checklist!

Unsubscribe from newsletter at any time.

4 min

5 Hair Products You Need for Your Wedding Day

Love is in the hair! Before you get hitched, you’ll realize that there are a lot of times when you’ll want to look your bridal best. Whether it’s getting ready for the big day, a bachelorette party, your bridal shower, or rehearsal dinner, your hair will be in your hands. But not without advice from our wedding wingman, Theresa Bullock of The Bridal Goddess! Theresa shared with us her top five product recommendations you need for styling wedding-worthy hair!

In a survey done by Instyle, the most common hair complaints among women include frizz, hairstyles not holding, and lack of volume. Fight these problems head-on by prepping your hair with the right products. 

Wedding Wingman Wisdom

“One of the most important things that gets skipped quite often is prepping the hair appropriately for hold, texture and thermal protection. I will spend a good 10-15 minutes prepping the hair because it’s really the foundation of the hairstyle.”

01. Heat Protectant – Surface Hair Impulse Finishing Spray

Heat Protectant

First things first, if you’re going to be using heat on your hair, you should apply a heat protectant! If you’re going to be using a blowdryer, damp hair is acceptable; however, in other cases, your hair should be dry. 

Whether you’re using a spray or cream, remember to distribute by combing the product evenly from roots to end. While it might be easy to skip, remember that it’s a crucial part of getting wedding-worthy hair so that on your big day your hair will be healthy.  

While hairspray is not anything new to most people, applying it before styling is a hairstylist tip that can change your hair game! 

“If the hair is too slippery and you’re doing any type of braiding, twisting or bobby pinning, your hair is going to slide right out of the style.”

To say goodbye to stiff and crunchy hair, Theresa suggests finding a workable hairspray. When you apply your hairspray before styling, you should be able to run your fingers through the hair to disperse it evenly.  

After you finish styling your hair, apply hairspray evenly to lock in the style. Apply sparingly to smooth frizz and flyaways. If you’re worried about your hair rubbing or getting caught on your dress – like maybe in a fishtail braid – spraying the underside of the braid will prevent this from happening. 

03. Texture Powder – Surface Hair Push Styling Powder

If you have straight hair, or even wavy or curly hair – you till need to add in more texture!

“Texture powder is anyone’s best friend for hair. It will give you volume. It will give you hold. Overall it’s just fantastic.”

Apply texture powder to the root of your hair and at your crown, and skip your ends. This helps with hairstyles such as a half up, half down in which you have to defy gravity to get volume. 

The product will come out looking like baby powder, but don’t worry, after you rub it in the product blends right into the scalp.

04. Finishing Spray – Surface Hair Taffy Wax Spray

After styling your hair, Theresa suggests you use stay-all-day products. These finishing products are for hold and will ensure your updo won’t turn into a down-do.    

Finishing spray is a spritz hairspray that’s going to lock in your style and, as said in the name, finish it off. Wait until the hairstyle is complete and everything is in place, as this is a heavier spray and is not as easy to work with after applying. 

Finishing spray can be aerosol or a spritz. Theresa recommends a spritz for brides with a lot of texture in their hair, as they can hold that extra weight.

05. Shine Spray – Surface Hair Bassu Shine Spray

Shine spray
Some of Theresa’s favorite products.

Shine spray is perfect for weddings because it gives the hair an extra luxurious look. The hair will have an extra sheen – not too shimmery, but just enough shine to make it look extra healthy and gorgeous. 

Don’t go crazy with it or your hair could appear greasy. Just a few sprays here and there will make your hair look extra beautiful. 

Not only will your hair look glossy when the light catches it in person, but it’s a great trick to make sure your hair will photograph well and look good in your wedding photos!

Meet Your Wedding Wingman!

Theresa Bullock has more than two decades of experience creating wedding-worthy hair for brides and their best gals. She founded The Bridal Goddess to help brides transform their vision into a reality. Her passion for helping others “look and feel like a goddess” brought her to Wed Mayhem.

Subscribe To Get Your Wedding Planning Checklist!

Unsubscribe from newsletter at any time.

Comments

Leave a Reply

Your email address will not be published. Required fields are marked *

Nothing Yet

Be the first one to comment!

This site is protected by reCAPTCHA and the Google Privacy Policy and Terms of Service apply.